
Showing posts with label baked ham. Show all posts
2 Bento #248 - Special Ham Sandwich
Thursday, April 19, 2012
Today we have a Special Ham Sandwich in an Easy Lunch Box. The ham is my family recipe baked ham, which is amaaaazing, and also why the sandwich is Special! The Special Ham Sandwich is about the only thing my father can make to eat, and as little girls (and big!) we LOVED when Mom baked a ham, and Daddy pulled it out Saturday morning and made us all Special Ham Sandwiches. He'd sit at the head of the kitchen table surrounded by his pot of tea, jars of mustard, mayo, pickles, pickled onions, lettuce and a loaf of bread with the cold ham right in the center of it all. We'd watch Saturday morning cartoons in the living room while he'd watch the news, and make sandwich after sandwich to order...half for one of us, and half for him. Love!
I'm not a fan of pickled onions, by the way, but Daddy is. He used to smuggle jars of them back from England in his suitcase. Also, I'm calling out my sister Liz for liking to drink the juice! I've shared the Special Ham Sandwich with E, though it's not quite as special since her Obbie's hands didn't prepare it. :-) This is how I always picture my dad, with his ubiquitous cup of tea (the very same china pattern I grew up with that is now mine - Royal Doulton Pastorale.) He's holding a two-day-old Miss E in this picture.
Bento #249 - Special Ham Sandwich with cheese, Clementine, sugar snap peas & dip. Snack - Macadamia nuts & carrot apple Crusher.
4 Sandwich Rollups
Thursday, October 20, 2011
Normally I make rollup/sushi sandwiches with tortilla shells (it's that whole flat and flexible thing.) This time I used two pieces of multi-grain bread with the crusts cut off. Microwave the bread for 10 seconds to make it really pliable.
Stack one slightly on top of the other, width-wise.
Roll it flat with a rolling pin.
Spread your toppings of choice - peanut butter & jelly
Or prosciutto -
And roll up!
0 Bento #209 - Waste Free Wednesday Ham Sandwich & Bell Peppers
Wednesday, September 7, 2011
I desperately need to go grocery shopping after this long weekend; I'm down to my last fresh veg, and I think I only have a couple of oranges left. I'm relying once more on some dried fruit, which is always nice to have around, especially since it's so portable.
By the way, this is part of E's school's Waste Free Wednesdays! She received a tie-dye cloth napkin for packing a waste-free lunch!
Sandwich today is grilled baked ham and cheddar on rye. The alphabet picks spell H-A-M (shocking, I know.)
I sliced half a yellow bell pepper and included a little piggy sauce cup full of ranch dip, and of course the aforementioned dried cherries with ring picks. By the way, if you ever get a package of picks with these in there, tell your kids not to put them on their fingers! We had a date with some dish soap and that ring last year.
I always say that you can find neat lunch containers in unexpected places. This bento box came from a Crocs store! They said that it was for storing Jibbitz, but it's a totally a 2-tier bento box, complete with a divider and an adorable bow band. It even has space on top for utensils. I think it was on clearance for $4. I have been packing snacks in a drawstring bag one of my older bento boxes came with. If something in her snack needs to be kept cold, I just stick it in her lunchbox with everything else.
Bento #209 - Baked ham & chedder on rye, dried cherries, sliced yellow bell pepper and dip. Snack - String cheese and an Apple Carrot Crusher.
Speaking of bento boxes, AllThingsForSale is having a bento giveaway on their blog right now, check it out!
0 Ham, Swiss & Chive Braid (and Iceland pictures)
Wednesday, August 3, 2011
Today for lunch I made a really simple dish that was just minutes to put together. If I had had some spinach or broccoli, I would have also added some.
Ingredients:
sheet of croissant dough or puff pastry
2 Tbls snipped chives
1/4 cup cubed baked ham
handful shredded Swiss cheese
pepper to taste
Pre-heat oven to 375.
Take a sheet of croissant dough and lay it out on your baking sheet. Going down the long side, make some perpendicular cuts for the "braids" all the way down, but leave a solid portion in the center so that your filling can be spooned on top. Oh if there ever was a post that needed the step-by-step photos...sorry guys!
Toss the filling ingredients lightly (I just did this with my fingers right on the chopping board) and spoon it into the center of the dough. Start at one end and "braid" the cut pieces by alternating one side to the other, slightly overlapping.
Bake for about 12-13 minutes at 375 or until the top is nice and golden brown. (Please excuse the scuzzy-looking pan...I call it patina!)
Okay, now for some pictures from our short stay in Iceland. We had a marvelous 8-hour tour of the Golden Circle with GTI Tours. Amazing, that's all I can say. See for yourself.
Running up an extinct volcano for a rock specimen for her rock collection.
Cracks in the continental plates. We stood on three different continental plates that day.
Sampling the glacier water.
Yes, the water really WAS this color of blue. Like nothing I'd ever seen before.
In front of a huge waterfall. (The rainbow is 100% real.)
Icelandic ponies.
Quaint old church.
You may be wondering if we ate there. Why yes, we did! However, the food was terrible, and even though I took some pictures, I won't post them. We should have just eaten the Icelandic specialty, which is lamb (also whale, but my conscience would never let me try it.) We instead had Italian (I was out-voted.) Not good, but we didn't visit Iceland for the food. ;)
4 Baked Mashed Potatoes
Wednesday, January 12, 2011
Okay, so we're really stretching it here in our house. We haven't been out of the house since Sunday! Today is yet another snow day stuck at home. We're getting creative with the items I have left in my fridge. Remember those mashed potatoes I served with the stuffed peppers? Well, I used the leftovers in last night's dinner.
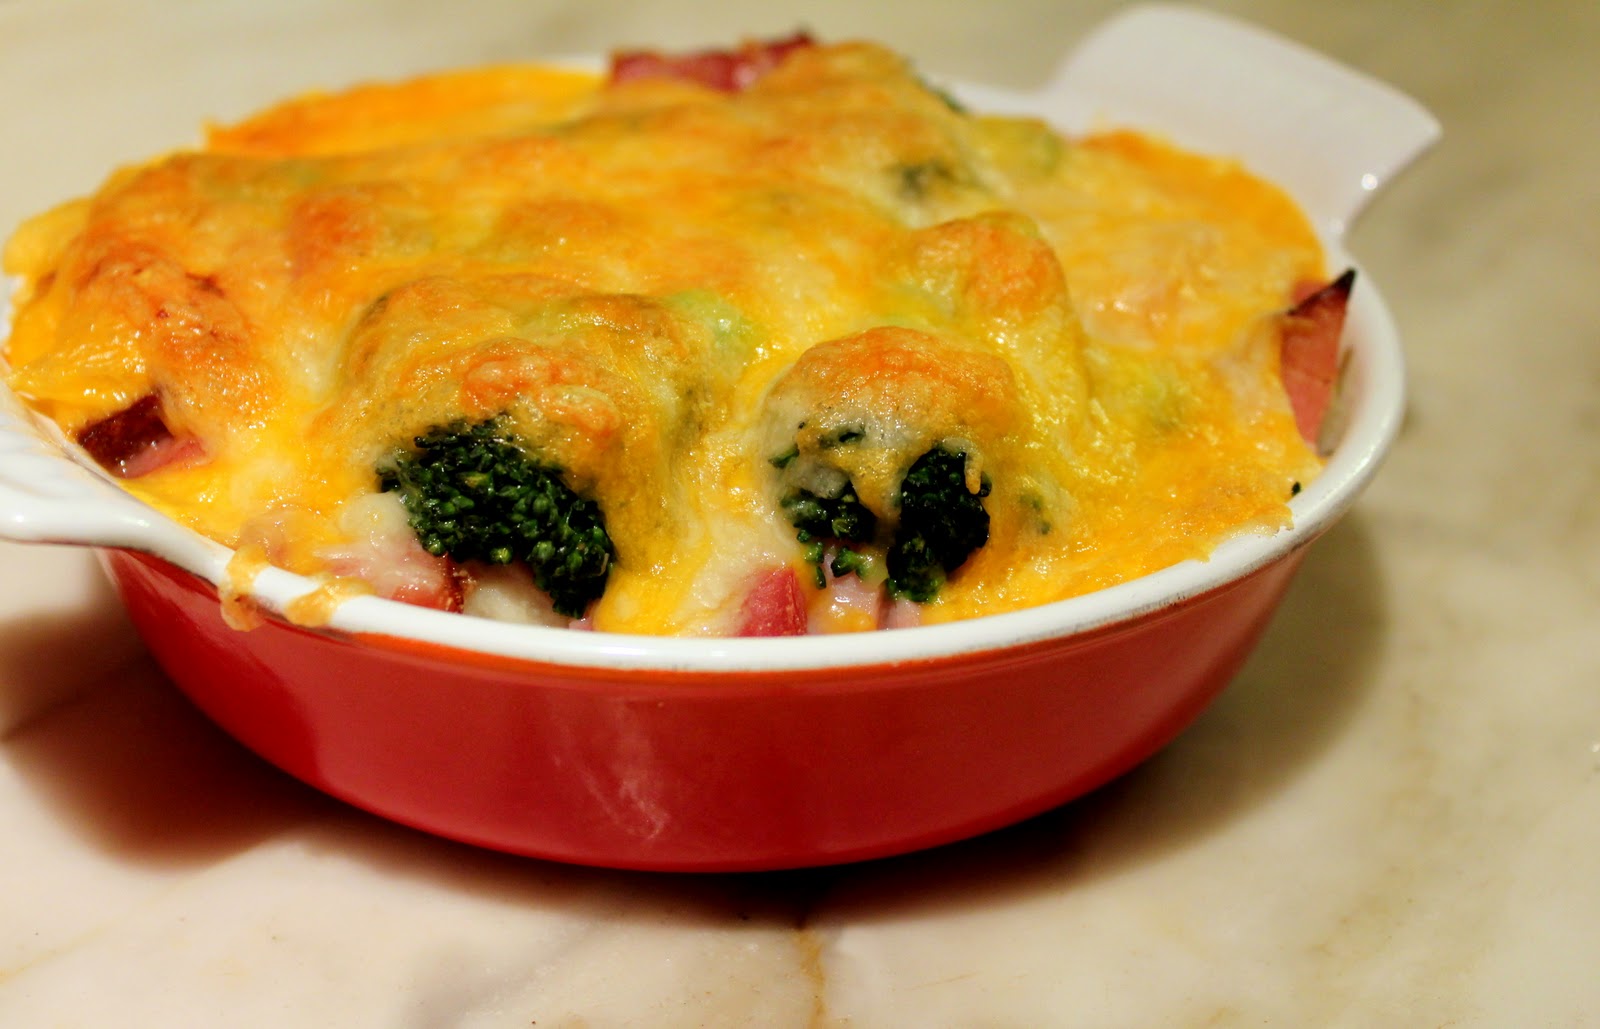
When I was vacationing in England as a girl, a fast food staple besides fish & chips, bangers & mash and Cornish pasties was a loaded baked potato. You could get them almost anywhere. They had a variety of hearty and delicious toppings, my favourite of which was ham, cheese and broccoli. It's really so simple with mashed potatoes, just layer the potatoes in an oven-safe dish (and I mix it with a little shredded cheese), diced ham, lightly steamed broccoli and cover with as much cheese as you like. Bake at 375 for about 10 minutes or until it's heated through and the cheese on top is bubbly.
Hmmmmm.
Ella really threw a fit when she saw hers because she did not want to try it. However when she did, she said it was "REALLY good" (several times!) and ate it right up.
Hopefully we'll be able to get out at some point today. Otherwise one or more of us may go nuts!
2 Bento #147 - Naan Pizza
Thursday, December 23, 2010
Today E and I made a naan bread pizza, with fresh tomato basil bruschetta as the base, shredded cheese, and a couple slices of ham. I buy naan in the frozen section at Trader Joe's, and now they sell it in the bakery area of Costco (which is where this naan came from.) It was baked at 400 for about 9 minutes.
Bento #147 - Naan pizza, fresh fruit salad, yogurt stars, sunflower seeds and celery.
4 Ebelskiver Experiment
Wednesday, June 9, 2010
What the heck is an ebelskiver (aebleskiver)? Well, it's a traditional Danish pancake that is made into a spherical shape, usually stuffed with apples, but can be stuffed with just about anything sweet or savory! I ordered this special pan a few weeks ago, and it finally arrived the other day. I was super excited to try my hand at it. I found just a very, very basic ebelskiver recipe for the batter, and grabbed items I knew could be a tasty filler - and who doesn't like broccoli, ham & cheese?
These were ridiculously simple to make, very surprisingly so. This particular batter turned out quite thick, which resulted in a dense (but nice) finished product, so you may want to experiment with the liquid levels.
You'll need:
4 Eggs
1/2 cup Water
1/2 cup Milk
1 tsp Salt
2 cups Flour
2 tsp Baking Powder
1 tbls garlic powder (opt)
3 tsp Italian herbs (opt)
ham, broccoli, cheese or any other type savory filling you like
2 wooden skewers/chopsticks or the like for turning
an ebelskiver pan
(sorry, no getting around it!)
Okay, so whisk your eggs, water and milk in a bowl and then add to your dry ingredients, and mix (not too much, though.)
Sautee your fillings if you wish - I used ham and broccoli, but you could use almost anything you like! It should be noted I hadn't added the herbs or garlic powder to the batter at this point, I added that later. I did say this was an experiment, right?
Heat your ebelskiver pan over medium flame, and brush each well with melted butter.
Fill each well about 3/4 of the way up. I don't know how I could survive without my spring-loaded scoop, it makes things so simple.
I taste-tested the finished ones, and found them to be a little bland, so that's when I added extra salt, some pepper, the herbs and garlic powder, and mixed in the cheese, broccoli and ham throughout the batter, and started again.
Lather, rinse, repeat.
Okay, yummy!!
Bottom line - I have so many ideas in my head right now for other types of ebelskiver, and I was just really pleased with the way the majority of them came out. I can't wait to try another batch!
These were ridiculously simple to make, very surprisingly so. This particular batter turned out quite thick, which resulted in a dense (but nice) finished product, so you may want to experiment with the liquid levels.
You'll need:
4 Eggs
1/2 cup Water
1/2 cup Milk
1 tsp Salt
2 cups Flour
2 tsp Baking Powder
1 tbls garlic powder (opt)
3 tsp Italian herbs (opt)
ham, broccoli, cheese or any other type savory filling you like
2 wooden skewers/chopsticks or the like for turning
an ebelskiver pan
Okay, so whisk your eggs, water and milk in a bowl and then add to your dry ingredients, and mix (not too much, though.)
Sautee your fillings if you wish - I used ham and broccoli, but you could use almost anything you like! It should be noted I hadn't added the herbs or garlic powder to the batter at this point, I added that later. I did say this was an experiment, right?
Heat your ebelskiver pan over medium flame, and brush each well with melted butter.
Fill each well about 3/4 of the way up. I don't know how I could survive without my spring-loaded scoop, it makes things so simple.
Now, in this point in my experiment I tried loading my fillings on top, thinking that they would sink into the middle like I'd seen in other ebelskiver recipes. My batter was too thick to sink, so it stayed on top, but they turned over beautifully and the cheese melted into a crispy cap, which was yummy. When they start to brown around the edges and you see bubbles in the middle, they are ready to turn with the chopsticks.
I taste-tested the finished ones, and found them to be a little bland, so that's when I added extra salt, some pepper, the herbs and garlic powder, and mixed in the cheese, broccoli and ham throughout the batter, and started again.
Lather, rinse, repeat.
Okay, yummy!!
Bottom line - I have so many ideas in my head right now for other types of ebelskiver, and I was just really pleased with the way the majority of them came out. I can't wait to try another batch!
3 Nana's Baked Ham
Saturday, January 23, 2010
Today I volunteered to make our family's famous baked ham for the volunteers at a building/remodeling project at our place of worship. I've done this ham a million times. I've even done 20 in one day, and baked it in hot coals in the sand at a beach camp-out for a large group! Trust me when I say, people love this ham.
Yesterday evening they gave me the ham to bake, and it was HUGE! 19 pounds on the bone, the biggest I've ever done. I normally do a half ham and cook it all day, so I was cutting it really close with a start time of 9am, and a deliver-by time of 4pm. The recipe below is for a half-ham on the bone, so double it for anything bigger than that.
half-ham hock, on the bone (low sodium and not sliced in any way - it dries it out!)
brown sugar (at least one box)
1 jar maraschino cherries (with juice)
2 cans pineapple chunks (with juice)
lots of ground cloves
Pre-heat your oven to 375.
Sprinkle a thick layer of the brown sugar on the bottom of your baking pot. I had to use a huge roasting pan this time, but I normally use a regular large stainless high-walled pot or very deep baking dish where it can sit in the baking syrup against the sides of the walls of the pot.
Trim the ham so that there is only a thin layer of fat covering it (make sure you leave some fat on there!) With this ham you can see the thick layer of fat, including the smoked brown portion you see - that is also fat. Trim it off.
Trimmed...3 pounds worth. Do leave a little fat on, but not a lot. (Yeah, it looks a little Silence of the Lambs, but I'm telling you, this thing was so unweildy I had to wait until the last moment to move it to the roasting pan.)
Next, sprinkle your cloves - liberally - all over the ham. Don't be shy.
Place the ham flattest-side down in your pot or roasting pan and sprinkle the top with cloves.
Pour all the juice from the pineapples and cherries over the sugar. Drop in half the cherries and chunks of pineapple.
Stir around the juices in the brown sugar until it becomes syrupy and spoon all over the ham. Cover with foil and place in hot oven and cook for an hour. Pull it out and baste it really well, reduce the heat to 325 and then continue basting every 30-45 minutes (and I mean do this religiously!)
The picture below is after cooking for about 4 hours - it gets deliciously brown and caramelized. Cook at least 5-6 hours, but even longer if you want it falling off the bone. Remove the foil during the last 45 minutes of baking, but please do remember to keep basting it during the entire cooking time.
Subscribe to:
Posts (Atom)